
CCP v2.1

1.Getting Started
-
For the latest and most up-to-date version of the guide and API documentation, always check the online version.
Cursor Controller Pro is the next step in our Free-Cursor Controller evolution. We’ve taken everything we’ve learned over the past year and a half with feedback on our first version and applied it to our massive 2.0 update. This means, tons of new features, bug fixes, and a much more streamlined process to help give developers the flexibility they need to use the tool effectively.
Implementing Cursor Controller into your project is a fairly straightforward process. Depending on if you are starting a new project or implementing into an existing one, there are a few different steps that need to be taken in order to ensure a smooth implementation.
1.1.CCP Control Panel
 There are 2 ways to add the Cursor Controller to your game. The 1st way is with the CCP Control Panel, that generates the prefab for you, and the 2nd way is manually.
STEPS:
1 – To set-up using the CCP Control Panel, go the first scene in your game that will need user control.
2 – Open the CCP Control Panel under Window/SlimUI/Cursor Controller Pro/Control Panel, and click SET UP.
3 – Set the Camera Render Mode to Camera in your scene that you’ll be using to render the cursor. It is highly recommended to make sure the camera rendering the cursor is ONLY used to render the cursor, as it needs to render the depth higher than any other camera, except in special cases where you don’t want the cursor to be on top, such as Fade or Loading Screens.
4 – Set the name of the Camera to the camera in your scene that will render the cursor. If you leave the space empty, a camera will be auto generated with the render mode you set its default values.
5 – Press GENERATE CONTROLLER, and a CursorControl prefab will instantiate in your scene. If you already have a CursorControl prefab in your scene, you will receive an Error (Warning in Console).
6 – Make the Cursor Camera a child object of CursorControl, or an object that won’t be destroyed, so that it doesn’t get destroyed when a new scene is loaded.
NOTE: Make sure your cursor camera projection mode is set to Orthographic instead of Perspective in order for tooltips to display properly.
The CursorControl prefab is instanced so only one will instantiate and not destroy on load. All your settings will carry over to each scene so you only have to focus on what player is active, and whether or not the cursor is enabled/disabled.
1.2.Demo Scene Breakdown
Under the Scenes folder, you can load up the MainDemo scene and test many of the features included in Cursor Controller Pro. We set up multiple windows where you can get inspired using the features in different scenarios, as well as many of the Cursor Styles included.

There are 6 Tab Windows:
Movement – Test the Movement of the Cursor, hover states, and edge bound detection.
Styles – Test a handful of Styles across the many different themes, and cursor tints.
Tooltips – Experiment with the various settings for Tooltips using the pop-up delay control, smoothing speed, and dynamic edge detection.
Inspector – Get a brief overview and breakdown of the Inspector layout for the CursorControl main prefab.
Parallax – Test the Parallax Window effect and adjust it’s intensity.
Multi-Player – Switch between Players 1-4 using a simple test environment, with each player having a unique cursor and input control. All input control can be modified using any 3rd party Input System, but the demo just features Unity’s default input system.
To see an overview of how the Default and Hover Animation states for cursors work, load the Style Previews scene.
1.3.Scripts Breakdown
There are a variety of scripts included with Cursor Controller Pro. Here is a brief breakdown and inspector screenshot for each one:
CONTROLLERS
CursorController – On the CursorControl prefab. The largest and main script included in the package. Controls all movement and behavior for all player cursors.

TooltipController – On the CursorControl prefab. The separated controller for Tooltips animation, smoothing, popup, and position.

SoundController – On the CursorControl prefab. The separated controller whose values are read by the SoundReceiver to play appropriate sounds on hover, click, and exit, as well as controlling pitch and Audio Mixer linking.

GeneralSettings – Scriptable Object parameter list for cursor behavior. An instance of GeneralSettings is spawned at the spawn of CursorControl. Intended values should be set while NOT in play mode because the editor values will be carried into play mode.

COMPONENTS
ButtonReceiver – The script that checks for the Cursor element interaction. If attached, the hover state will trigger, as well as the tooltip (if enabled).

SoundReceiver – The script that checks for CUrsor element interaction. If attached, when the cursor enters, clicks, or exits, depending on which boxes are ticked, will play the respecting sounds.

ParallaxWindow – If placed on a RectTransform, will check the Parallax Strength value on CursorController and enable an opposite parallax movement effect.

CursorTint – Placed on the root of each cursor style prefab. If attached, it will check all the child objects that need to be tinted.

TintBypass – Placed on individual Image components that you want to avoid color tinting. The CursorTint script placed on the root of each cursor style prefab will check all child image components by bypass any with TintBypass attached.
![]()
INPUT SYSTEM
IInputProvider – The interface that provides functions that allow CursorController to not directly reference Unity’s Input system.
DefaultInputProvider – Our example of an Input provider using the provided interface. This script can be replaced by your own input provider reading the Input strings from a 3rd party plugin or your own, as long as all the interface functions are being called.
DEMO ONLY
Demo – The Demo Scene controller, accessing the CursorControl prefab and changing cursor behavior with demo only methods.
DemoOpening – Plays Demo opening/closing pop up window animations
FadeTest – Placed on the root of a Cursor Style prefab to test its Default and Hover state animations by pressing “r”
AutomaticAnimating – Placed on the root of a Cursor Style prefab to have it automatically switch between Default and Hover state animations on a 1 second timer.
1.4.Integration
In most cases, Cursor Controller Pro would be imported into an existing project. Adding the controller to an existing project is very easy to do, but may require some changes on the development side if the Menu system isn’t using Screen Space – Camera for its UI. Currently, we are working on a solution to support Screen Space – Overlay. Here are some situations when integrating into a project that you might encounter, as well as solutions for each of them:
- CURSOR IS NOT RENDERING BUT IT IS MOVING IN THE SCENE VIEW
In this example, I set the Camera object as a child object of the main camera controller for my project. That main camera controller does not get destroyed so I can be sure that CursorControl will always have a camera link. I also set the Clear Flags to Don’t Clear and the Culling Mask to only render the UI Layer, which CursorControl is set to by default. Double check that the Distance of CursorControl does not exceed the max render clipping plane of the Camera, otherwise the cursor will not render. This is an easily overlooked error.


2.The Cursor Overview
When your game is using a Free-Cursor system, it’s extremely important to get the feeling of the cursor right. That is the main tool that players will be using to interact with your UI, so it has to be right. We have included many ways that you can customize the cursor behavior to fit your game.
2.1.General Settings

It’s very simple to modify the behavior of the cursor by going to the GeneralSettings scriptable object under Resources/SlimUI/Settings. You can modify the follow values:
Horizontal Speed – The X-Axis movement speed of the cursor at full speedVertical Speed – The Y-Axis movement speed of the cursor at full speed
Hover Multiplier – The speed modifier of the cursor when it is in a hover state (over buttons). Speed * Multiplier = Hover Speed
Cursor Scale – A scale multiplier adjusting the overall size of the cursor from a ratio range of 0.5 – 1.5.
Dead Zone – The minimum value of Input Axis required to the cursor. This is very similar to Unity’s default Dead Zone value, but just adds on to the default.
Max Detection Distance – In some situations you will use a World Space Canvas. The Max Detection is the farthest distance that the cursor raycast will reach before returning a null Hit.
Cursor Z Offset – Depending on your Camera set up in your scene, you might need to change the distance of the cursor to the camera in order to have it render in front of the camera instead of behind. If the cursor isn’t showing up on the screen, or appearing very large or not on the canvas menu, adjust this value.
2.2.Changing Cursor Style

CursorController.cs uses Resources.LoadAll() to find every prefab under the SlimUI/Prefabs/Cursors folder to add it to the list of potential cursor styles. The first Starting Cursors string is Player 1 and the Cursor that will always be the first to show. That is THE starting cursor. To change the starting cursor, enter the name of the cursor from the Prefabs folder that you want to use. Remember, strings are case sensitive.
Player 2, 3, and 4 follow the same rules for changing cursors.
2.3.Disabling/Enabling Cursor
In most cases, there will be situations where the ability to control the cursor needs to be changed, such as: Pausing & Resuming the game or opening a menu. All you have to do to Enable or Disable control of the cursor is to call PauseGame() and ResumeGame(), and then add the SlimUI.CursorControllerPro namespace:
![]()
- Pause Game will enable the cursor control to whatever the last detected device was.

- Resume Game will freeze the cursor and hide it, depending on the current active player (1-4).

2.4.Cursor Tints
All of the elements that make up each of our cursor styles are uncolored, being completely uncolored, allowing developers to tint them any color. You can either tint an entire Cursor Style and all of its child components, or individual components.
To Tint an entire cursor, tick the Cursor Tint box in the CursorControl inspector. The color that is set here will be applied to the cursor style root and all of its children.

To have control over individual components, attach a CursorTint.cs component on the root cursor style prefab. Ticking the Local Tint Override box will override the CursorController’s settings, allowing you to disregard the color that it’s assigned. If you tick the box, the Tint on CursorTint will be applied across all child Image components.

Bypassing Tint on individual Image components can be done by selecting the Image components that you want to remain a default color and attaching a TintBypass.cs component to them. The CursorTint script will check all script components but pass over all components with TintBypass attached.

The cursor seen here contains the Override Tint color from the Cursor Controller root, but keeps the default uncolored components with TintBypass attached to them.

2.5.Creating Your Own Cursor Styles
Each cursor style has 2 Animation state: Default, Hover. To create your own cursor, Duplicate a cursor Animator and its 2 animations and move them into the custom folder to organize them (SlimUI/CursorControllerPro/Animations/Cursors/Custom). Rename the files to something unique.

The reason for duplicating an existing Animator controller is so the animation links and transitions are already set.

Rearrange any of the Image components of the cursor and switch out the Images with any of the provided graphics in the Graphics folder (SlimUI/CursorControllerPro/Graphics), or use your own images. Animating a custom cursor requires at least basic knowledge of the Unity Animator and Animation system.
To set the default and hover animations, in MOST cases, there are only frames at 0:00 for both Default and Hover. You can modify the transition parameters for more complex animations, but for simplicity and ease of use we have set up a majority of our included cursor styles with 1 frame in each state.

3.Tooltips
Tooltips are a way to clear up screen real estate by hiding information behind small windows. Enabling tooltips are done individually through the ButtonReceiver.cs script attached to any button. Enable a tooltip by ticking the Has Tooltip box. Then, change the text of the tool tip by filling in the string fields.


3.1.Tooltip Animations
Changing Tooltip Animations is easy to do. We have included 5 different Fade In and Fade Out animation presets for you to choose from. To change the preset animation on the tool tip, find the ToolTipContainer prefab in the Project View and switch the Animator Component’s Controller to one of the other presets. Because all the ToolTipContainer prefabs in the CursorControl root prefab are linked, updating the animation presets in the Project view will update for all of them in the scene.

To make your own Tooltip Animation, duplicate one of the folders and edit the key frames for the Fade In and Fade Out animations.

4.Dynamic UI At Runtime
In some cases, a game menu or Canvas might require a button to be instantiated at runtime. Buttons are very simple to set up and only require the ButtonReceiver.cs script to be attached as a component to a button root game object. Just like with a preset menu button, enabling a tooltip just require ticking the Has Tooltip box.

If you’re instantiating a Rect Transform at run time and you want it to have the Parallax behavior, make sure the ParallaxWindow.cs script is attached as a component and the Auto Find Controller box is checked, allowing the script to find the CursorControl prefab on spawn without the user assigning it manually.

5.Sound Controller
The Sound Controller is attached to the CursorControl prefab and allows buttons to to play audio from attached audio source components. Setting the Audio Mixer allows you to have greater control over the volume and effects of hover, click, or exit sounds. The audio files and slider values assigned in the Sound Controller will be passed down to any button with a SoundReceiver.cs component attached. This way, sounds, pitch, and volume are all controlled globally instead of on individual buttons.
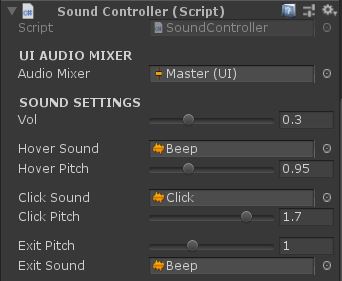
In most cases, each button that the user can interact with will have ButtonReceiver.cs attached as well as SoundReceiver.cs. To Enable/Disable which sounds play on triggering events, tick the boxes appropriately. In the following example, the hover and click sounds are playing but not the cursor exit sound.
A button will NOT play any sound if there is no SoundReceiver.cs script attached. The sound receiver is an optional component and not necessary for a button to work properly.

6.Parallax Windows
The Parallax Window effect mimicks the similar effect found in many large titles from the past few years. The cursor moves in a direction with the window moving in the opposite direction to close the distance that the cursor has to travel to reach a button faster. The strength of the contrasing movement can be adjusted using the slider on CursorControl. This value is applied to all windows in the scene that have the ParallaxWindow.cs script attached. This script acts as a signal receiver, allowing the movement to happen.

The ParallaxWindow.cs component must be added to a RectTransform in order for it to function properly. The Rect Transform Anchor Presets can be set to anything, but make sure that the X and Y position of the rect transform is starting its origin (0,0).
Below is an example of how the parallax Window movement behaves.

7.Multiple Players
Cursor Controller Pro allows for up to 4 players to be controlled individually. Currently, Unity does NOT allow for more than one EventSystem to be running at a time, which means the engine can only detect the position and event triggers for ONE cursor at a time. That is sad, yes! But we have built in a system that allows you to switch between the 4 player easily. In the demo, under the Multi-Player, you can select a number from the button list and Unity will switch control to the next consecutive player.
To switch control to a player, call ChangeActivePlayer(active player index) on CursorController.cs; on the CursorControl prefab. Calling ChangeActivePlayer() will disable the current player first and then re-enable the new active player.
Index mapping for each player:
0 = Player 1
1 = Player 2
2 = Player 3
3 = Player 4
How do you set up the players? Follow these steps:
STEP 1: The Cursor styles for each Player can be set in the Inspector for CursorController. Set the string name for each player as one of the prefabs in the Cursor list. If a string doesn’t match one of the prefabs exactly you will receive an error at the start of Play mode.
STEP 2: Set the Players drop down list to the MAX number of players possible in your game. In most cases, you are playing Single Player so set that to 1.

STEP 3: No matter what Input Provider you are using, set the name of the Input Axis names being used in your Input System in the inspector of CursorController. By default, the string names match Unity’s default input system.

8.Frequently Asked Questions
Q: After switching to cursor control, all Canvas input is disabled
A: Check for any EventSystems in your scene that aren’t part of the CursorControl prefab. Your EventSystem is most likely being overwritten by another EventSystem component.
Q: The cursor is huge not showing in the frame of the camera, even though the cursor is moving normally.
A: Your camera projection has to be set to “Orthographic” instead of “Perspective.” This is also the only way tooltips will work.
Q: I’m using a World Canvas and my mouse hovering works but using a controller doesn’t?
A: Check the camerathat’s being used as the renderer’s clipping planes. Check the Near clipping plane. Lower the number (instead of -500, maybe -50?)
Q: My buttons aren’t being detected by the Cursor. Why?
A: Make sure a ButtonReceiver.cs component is attached to the same game object with the Button component attached.
Q: My cursors are not animating all child objects. Why?
A: Make sure you do not re-organize or rename child objects as Unity’s Animator system will unlink the keyframes for that cursor’s animation.
Q: Can I modify the animations of each cursor without affecting the others?
A: Yes! Each cursor has it’s own Animator so you can modify all of them without having any overlap.
Q: Does Cursor Controller Pro detect all UGUI Elements?
A: Currently, ONLY Buttons have been tested and confirmed to work with the Cursor Controller.
Q: Do I need programming experience to use Cursor Controller Pro?
A: No! We are proud that Cursor Controller Pro can be used by developers of all experiences. You can modify the code to get specific behaviors that are otherwise not included in the base package, but all the features in the features list are able to be used completely without modifying a single line of source code. Minimal code needs to be used in order to call the ResumeGame() and PauseGame() methods, but you do not have to modify source code.
Q: Can I use my own EventSystem?
A: No! Cursor Controller Pro has its own EventSystem management that will break if you have another event system in the scene. Make sure there is only the CursorControl prefab’s Event System in your scene.
Q: What Canvas types are supported?
A: Screen Space – Camera & World Space. Screen Space – Overlay support is currently in development.
9.More Resources
For support questions, you can either email us on the Support page or join our Discord: https://discord.gg/7cK4KBf

10.Input Settings
The Input Settings file settings to use as default, or guideline for getting proper cursor movement acceleration and sensitivity set up. These input settings don’t apply when you are using your own input system or a 3rd party plugin. The Axis names for all 4 players are assigned in the CursorController inspector.

The default values for the Axis’ are:
Gravity: 25
Dead: 0.1
Sensitivity: 1
Invert: TRUE (Only for Y Axis)
Screenshot references for the Axis values:


10.1.Integrating InControl
Once you’ve imported InControl into your project, you can import the unity package InControl_Extension found under the CursorControllerPro folder. It will import a demo scene, as well as the InControl input provider template script.
On the CursorControllerPro Assembly Definition, make sure “Use GUIDs” is ticked, and the InControl Assembly Definition is assigned in the slot.
By this point, you should be able to test InControl by loading the demo scene provided in the extension unity package (InControl Demo).
If you select the CursorControl prefab in the demo scene and select the child object InputSystemProvider, you’ll notice the default input provider component was removed and the inControl provider was added as a component.
10.2.Integrating ReWired
ReWired Integration graciously provided by the github user Lackey94
https://github.com/lackey94/SlimUIExtensions
11.Upgrading From Older Versions
Upgrade Guide coming soon! Please reach out on our DISCORD server if you need to upgrade immediately. Thank you!